Project
1.Tempratcher sensor (DTH11)
project Description: This project can check Tempratcher and Humidity.
What is Humidity
Circuit
Code
 #include <SimpleDHT.h>
 SimpleDHT11 dth;
 // for DHT11,
 //   VCC: 5V or 3V
 //   GND: GND
 //   DATA: 2
 int pinDHT11 = 2;
 void setup() {
  Serial.begin(9600);
  Serial.println("Temperature and Humidity");
 }
 void loop() {
  byte temperature = 0;
  byte humidity = 0;
  dth.read(pinDHT11, &temperature, &humidity, NULL);
  Serial.print("Temperature = ");
  Serial.println(temperature);
  Serial.print("Humidity = ");
  Serial.println(humidity);
  delay(2000);
 }
2. ultrasonic sensor distance show in the serial monitor and Buzzer.
project Description: In this project, we see distance management in the serial monitor and buzzer.
Circuit 1
Code 1
 int trig = 8, echo = 7;
 long duration , cm , inche;
 void setup() {
  // put your setup code here, to run once:
   Serial.begin(9600);
   pinMode(trig, OUTPUT);
   pinMode(echo, INPUT);
 }
 void loop() {
  // put your main code here, to run repeatedly:
  digitalWrite(trig, HIGH);
  delay(20);
  digitalWrite(trig, LOW);
  duration = pulseIn(echo , HIGH);
  cm = duration * 0.034/2;   // cm
  inche = duration * 0.0133/2; // inche
  Serial.print("CM = ");
  Serial.println(cm);
  Serial.print("Inche = ");
  Serial.println(inche);
  delay(1000);
 }
Circuit 2
Code 2
 int trig = 8, echo = 7;
 int buzzer = 12;
 long duration , cm , inche;
 void setup() {
  // put your setup code here, to run once:
   Serial.begin(9600);
   pinMode(trig, OUTPUT);
   pinMode(echo, INPUT);
   pinMode(buzzer, OUTPUT);
 }
 void loop() {
  // put your main code here, to run repeatedly:
  digitalWrite(trig, HIGH);
  delay(20);
  digitalWrite(trig, LOW);
  duration = pulseIn(echo , HIGH);
  cm = duration * 0.034/2;   // cm
  inche = duration * 0.0133/2; // inche
  if (cm <= 10){
   digitalWrite(buzzer, HIGH);
  }
  else{
  digitalWrite(buzzer, LOW);
 }
  Serial.print("CM = ");
  Serial.println(cm);
  Serial.print("Inche = ");
  Serial.println(inche);
  delay(1000);
 }
3. GAS Detector Project.
project Description: In this project, you can detective gas.
Circuit 1
Code 1
 long gas;
 void setup() {
  // put your setup code here, to run once:
  Serial.begin(9600);
 }
 void loop() {
  // put your main code here, to run repeatedly:
  gas = analogRead(A5);
  Serial.print("Value= ");
  Serial.println(gas);
  delay(1000);
 }
Circuit 2
Code 2
 long gas;
 int buzzer = 7;
 void setup() {
  // put your setup code here, to run once:
  Serial.begin(9600);
  pinMode(buzzer,OUTPUT);
 }
 void loop() {
  // put your main code here, to run repeatedly:
  gas = analogRead(A5);
  Serial.print("Value= ");
  Serial.println(gas);
  if(gas>600){
   digitalWrite(buzzer , HIGH);
  }
  else{
   digitalWrite(buzzer , LOW);
  }
  delay(1000);
 }
4. Bluetooth Module Project.
Mobile APK Download
Circuit 1
Code 1
 char value = 0;
 void setup()
 {
  Serial.begin(9600);
 }
 void loop()
 {
  if (Serial.available()>0){
    value = Serial.read();
       Serial.println(value);
  }
  delay(50);
 }
Circuit 2
Code 2
 char value = 0;
 #define led1 13
 void setup()
 {
  Serial.begin(9600);
  pinMode(led1,OUTPUT);
 }
 void loop()
 {
  if (Serial.available()>0){
    value = Serial.read();
    if(value == '1'){
     digitalWrite(led1,HIGH);
    }
    else if(value == '0'){
     digitalWrite(led1,LOW);
    }
       Serial.println(value);
  }
  delay(50);
 }
Circuit 3
Code 3
 char value = 0;
 #define led1 13
 #define led2 12
 #define led3 10
 #define led4 11
 void setup()
 {
  Serial.begin(9600);
  pinMode(led1,OUTPUT);
  pinMode(led2,OUTPUT);
  pinMode(led3,OUTPUT);
  pinMode(led4,OUTPUT);
 }
 void loop()
 {
  if (Serial.available()>0){
    value = Serial.read();
    if(value == '1'){
     digitalWrite(led1,HIGH);
    }
    else if(value == '0'){
     digitalWrite(led1,LOW);
    }
       else if (value == '2'){
            digitalWrite(led2,HIGH);
       }
       else if(value == '3'){
     digitalWrite(led2,LOW);
    }
       else if (value == '4'){
           digitalWrite(led3,HIGH);
       }
       else if(value == '5'){
     digitalWrite(led3,LOW);
    }
       else if (value == '6'){
           digitalWrite(led4,HIGH);
       }
       else if(value == '7'){
     digitalWrite(led4,LOW);
    }
       Serial.println(value);
  }
  delay(50);
 }
5. Bluetooth Module With Relay Board Project.
Code 1
 char value = 0;
  #define relay1 13
  #define relay2 12
  #define relay3 10
  #define relay4 11
  void setup()
  {
  Serial.begin(9600);
  pinMode(relay1,OUTPUT);
  pinMode(relay2,OUTPUT);
  pinMode(relay3,OUTPUT);
  pinMode(relay4,OUTPUT);
  }
  void loop()
  {
  if (Serial.available()>0){
   value = Serial.read();
   if(value == '1'){
    digitalWrite(relay1,HIGH);
   }
   else if(value == '0'){
    digitalWrite(relay1,LOW);
   }
     else if (value == '2'){
       digitalWrite(relay2,HIGH);
     }
     else if(value == '3'){
    digitalWrite(relay2,LOW);
   }
     else if (value == '4'){
       digitalWrite(relay3,HIGH);
     }
     else if(value == '5'){
    digitalWrite(relay3,LOW);
   }
     else if (value == '6'){
       digitalWrite(relay4,HIGH);
     }
     else if(value == '7'){
    digitalWrite(relay4,LOW);
   }
     Serial.println(value);
  }
  delay(50);
  }
6. Receiving data from the sensor and showing in the mobile phone use of Bluetooth Module.
Circuit 1
Code 1
 #include <SimpleDHT.h>
  SimpleDHT11 dth;
  // for DHT11,
  //  VCC: 5V or 3V
  //  GND: GND
  //  DATA: 2
  int pinDHT11 = 2;
  void setup() {
  Serial.begin(9600);
  Serial.println("Temperature and Humidity");
  }
  void loop() {
  byte temperature = 0;
  byte humidity = 0;
  dth.read(pinDHT11, &temperature, &humidity, NULL);
  Serial.print("Temperature = ");
  Serial.println(temperature);
  Serial.print("Humidity = ");
  Serial.println(humidity);
  delay(2000);
  }
Code 1
 char value = 0;
 void setup(){
  Serial.begin(9600);
 }
 void loop(){
  if (Serial.available()>0){
   value = Serial.read();
   Serial.println(value);
  }
  delay(50);
 }
8. Measure soil moisture using Arduino Project
Circuit 1
Code 1
 int soil;
 void setup() {
  // put your setup code here, to run once:
  Serial.begin(9600);
 }
 void loop() {
  // put your main code here, to run repeatedly:
  soil = analogRead(A0);
  Serial.println(soil);
  delay(500);
 }
9. PIR sensor using Arduino Project
Circuit 1
Code 1
 int pir = 2;
 int led = 13;
 int value;
 void setup() {
  // put your setup code here, to run once:
  pinMode(pir,INPUT);
  pinMode(led,OUTPUT);
 }
 void loop() {
  // put your main code here, to run repeatedly:
  value = digitalRead(pir);
  digitalWrite(led,value);
 }
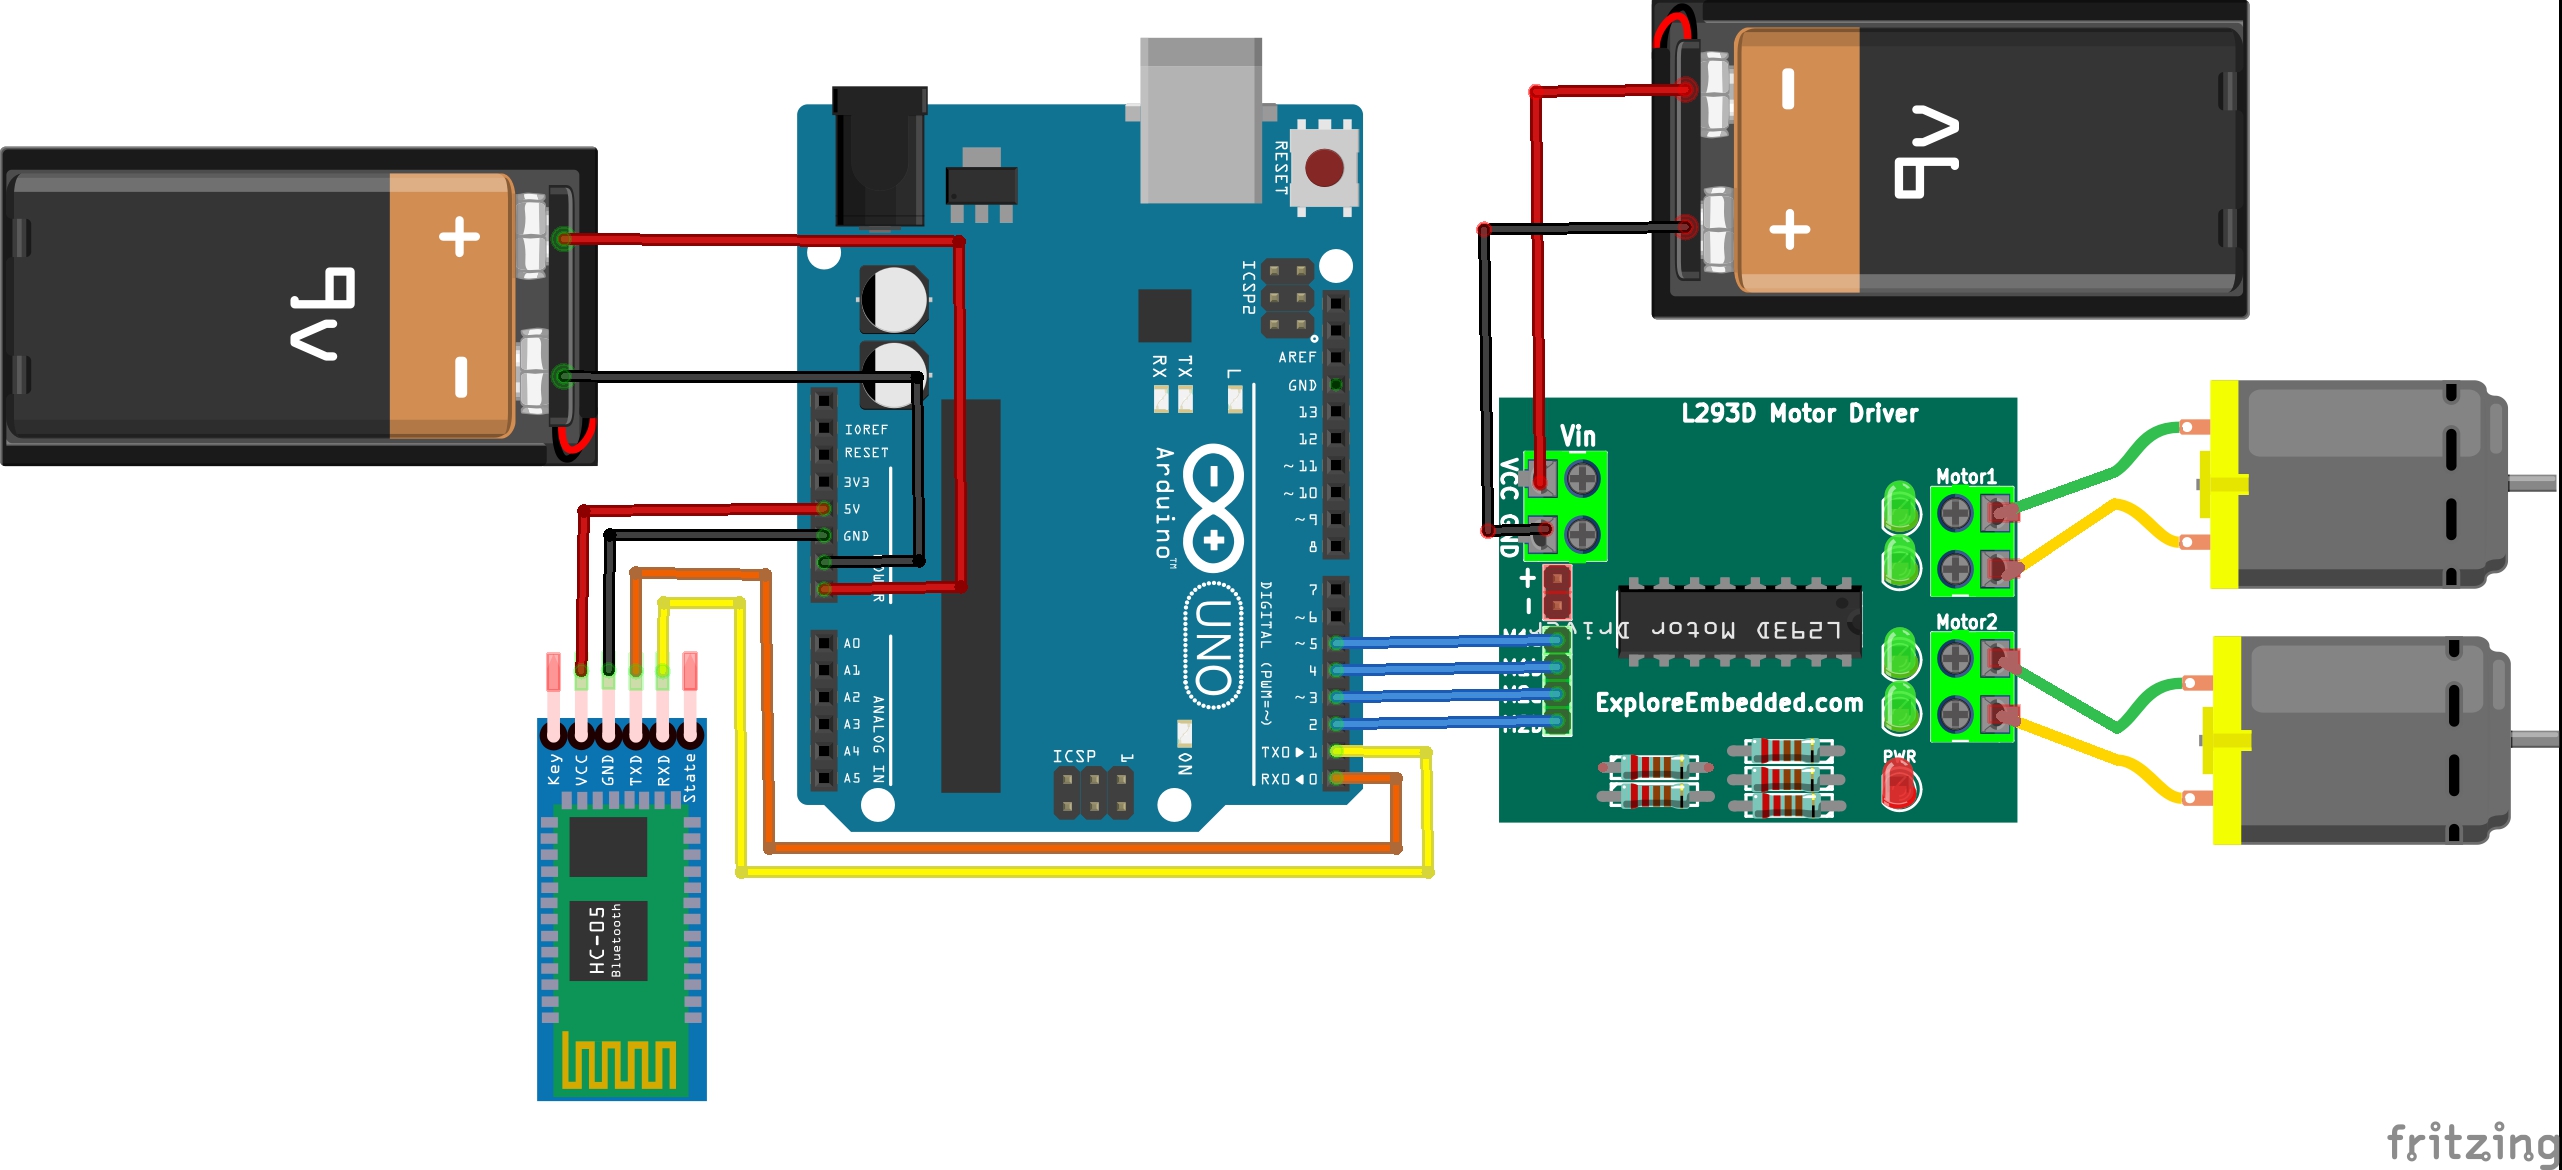
10. Bluetooth Controlled Car
Circuit 1
Code 1
 char t;
 #define m1 2
 #define m2 3
 #define m3 4
 #define m4 5
 void setup() {
 Serial.begin(9600);
 pinMode(m1,OUTPUT);  //right motors forward
 pinMode(m2,OUTPUT);  //right motors reverse
 pinMode(m3,OUTPUT);  //left motors forward
 pinMode(m4,OUTPUT);  //left motors reverse
 }
 void loop() {
 if(Serial.available()){
  t = Serial.read();
 }
 if(t == 'W'){      //move forward(all motors rotate in forward direction)
  digitalWrite(m1,HIGH);
  digitalWrite(m2,LOW);
  digitalWrite(m3,HIGH);
  digitalWrite(m4,LOW);
 }
 else if(t == 'S'){   //move reverse (all motors rotate in reverse direction)
  digitalWrite(m1,LOW);
  digitalWrite(m2,HIGH);
  digitalWrite(m3,LOW);
  digitalWrite(m4,HIGH);
 }
 else if(t == 'A'){   //turn right (left side motors rotate in forward direction, right side motors rotate in reverse direction for 100ms & stop)
  digitalWrite(m1,HIGH);
  digitalWrite(m2,LOW);
  digitalWrite(m3,LOW);
  digitalWrite(m4,HIGH);
  delay(100);

 }
 else if(t == 'D'){   //turn left (right side motors rotate in forward direction, left side motors rotate in reverse direction for 100ms & stop)
  digitalWrite(m1,LOW);
  digitalWrite(m2,HIGH);
  digitalWrite(m3,HIGH);
  digitalWrite(m4,LOW);
  delay(100);

 }
 else if((t == 's')||(t == 'w')||(t == 'a')||(t == 'd')){   //STOP (all motors stop)
  digitalWrite(m1,LOW);
  digitalWrite(m2,LOW);
  digitalWrite(m3,LOW);
  digitalWrite(m4,LOW);
 }
 delay(100);
 }
11. Voice Controlled Car
Circuit 1
Code 1
 #define m1 2
 #define m2 3
 #define m3 4
 #define m4 5
 void setup()
 {
  pinMode(m1, OUTPUT);
  pinMode(m2, OUTPUT);
  pinMode(m3, OUTPUT);
  pinMode(m4, OUTPUT);
  Serial.begin(9600);
 }
 void loop()
 {
  if (Serial.available())
  {
  String voice = Serial.readString();
  Serial.println(voice);
  if(voice == "forward")
  {
   digitalWrite(m1, HIGH);
   digitalWrite(m2, LOW);
   digitalWrite(m3, HIGH);
   digitalWrite(m4, LOW);
   }
   if(voice == "backward")
  {
   digitalWrite(m2, HIGH);
   digitalWrite(m1, LOW);
   digitalWrite(m4, HIGH);
   digitalWrite(m3, LOW);
   }
   if(voice == "left")
  {
   digitalWrite(m1, LOW);
   digitalWrite(m2, LOW);
   digitalWrite(m3, HIGH);
   digitalWrite(m4, LOW);
   }
   if(voice == "right")
  {
   digitalWrite(m1, HIGH);
   digitalWrite(m2, LOW);
   digitalWrite(m3, LOW);
   digitalWrite(m4, LOW);
   }
  else if(voice == "stop")
  {
   digitalWrite(m1, LOW);
   digitalWrite(m2, LOW);
   digitalWrite(m3, LOW);
   digitalWrite(m4, LOW);
  }
  }
 }
Code 2 use Function and delay
  #define m1 2
  #define m2 3
  #define m3 4
  #define m4 5
  void setup()
  {
  pinMode(m1, OUTPUT);
  pinMode(m2, OUTPUT);
  pinMode(m3, OUTPUT);
  pinMode(m4, OUTPUT);
  Serial.begin(9600);
  }
  void loop()
  {
  if (Serial.available())
  {
  String voice = Serial.readString();
  Serial.println(voice);
  if(voice == "forward")
  {
    forward();
    delay(1000);
    stope();
   }
   if(voice == "backward")
  {
   backward();
   delay(1000);
    stope();
   }
   if(voice == "left")
  {
   left();
   delay(500);
   stope();
   }
   if(voice == "right")
  {
    right();
   delay(500);
   stope();
   }
  else if(voice == "stop")
  {
    stope();
  }
  }
  }
 void forward(){
   digitalWrite(m1, HIGH);
   digitalWrite(m2, LOW);
   digitalWrite(m3, HIGH);
   digitalWrite(m4, LOW);
 }
 void backward(){
   digitalWrite(m2, HIGH);
   digitalWrite(m1, LOW);
   digitalWrite(m4, HIGH);
   digitalWrite(m3, LOW);
 }
 void left(){
   digitalWrite(m1, LOW);
   digitalWrite(m2, LOW);
   digitalWrite(m3, HIGH);
   digitalWrite(m4, LOW);
 }
 void right(){
   digitalWrite(m1, HIGH);
   digitalWrite(m2, LOW);
   digitalWrite(m3, LOW);
   digitalWrite(m4, LOW);
 }
 void stope(){
   digitalWrite(m1, LOW);
   digitalWrite(m2, LOW);
   digitalWrite(m3, LOW);
   digitalWrite(m4, LOW);
 }
12. line following robot
Circuit 1
Code
#define enA 10//Enable1 L298 Pin enA
#define in1 9 //Motor1  L298 Pin in1
#define in2 8 //Motor1  L298 Pin in1
#define in3 7 //Motor2  L298 Pin in1
#define in4 6 //Motor2  L298 Pin in1
#define enB 5 //Enable2 L298 Pin enB

#define R_S A0 //ir sensor Right
#define L_S A1 //ir sensor Left

void setup(){ // put your setup code here, to run once

pinMode(R_S, INPUT); // declare if sensor as input
pinMode(L_S, INPUT); // declare ir sensor as input

pinMode(enA, OUTPUT); // declare as output for L298 Pin enA
pinMode(in1, OUTPUT); // declare as output for L298 Pin in1
pinMode(in2, OUTPUT); // declare as output for L298 Pin in2
pinMode(in3, OUTPUT); // declare as output for L298 Pin in3
pinMode(in4, OUTPUT); // declare as output for L298 Pin in4
pinMode(enB, OUTPUT); // declare as output for L298 Pin enB

analogWrite(enA, 150); // Write The Duty Cycle 0 to 255 Enable Pin A for Motor1 Speed
analogWrite(enB, 150); // Write The Duty Cycle 0 to 255 Enable Pin B for Motor2 Speed
delay(1000);
}
void loop(){
if((digitalRead(R_S) == 0)&&(digitalRead(L_S) == 0)){forword();}   //if Right Sensor and Left Sensor are at White color then it will call forword function

if((digitalRead(R_S) == 1)&&(digitalRead(L_S) == 0)){turnRight();} //if Right Sensor is Black and Left Sensor is White then it will call turn Right function

if((digitalRead(R_S) == 0)&&(digitalRead(L_S) == 1)){turnLeft();}  //if Right Sensor is White and Left Sensor is Black then it will call turn Left function

if((digitalRead(R_S) == 1)&&(digitalRead(L_S) == 1)){Stop();} //if Right Sensor and Left Sensor are at Black color then it will call Stop function
}

void forword(){  //forword
digitalWrite(in1, HIGH); //Right Motor forword Pin
digitalWrite(in2, LOW);  //Right Motor backword Pin
digitalWrite(in3, LOW);  //Left Motor backword Pin
digitalWrite(in4, HIGH); //Left Motor forword Pin
}

void turnRight(){ //turnRight
digitalWrite(in1, LOW);  //Right Motor forword Pin
digitalWrite(in2, HIGH); //Right Motor backword Pin
digitalWrite(in3, LOW);  //Left Motor backword Pin
digitalWrite(in4, HIGH); //Left Motor forword Pin
}

void turnLeft(){ //turnLeft
digitalWrite(in1, HIGH); //Right Motor forword Pin
digitalWrite(in2, LOW);  //Right Motor backword Pin
digitalWrite(in3, HIGH); //Left Motor backword Pin
digitalWrite(in4, LOW);  //Left Motor forword Pin
}

void Stop(){ //stop
digitalWrite(in1, LOW); //Right Motor forword Pin
digitalWrite(in2, LOW); //Right Motor backword Pin
digitalWrite(in3, LOW); //Left Motor backword Pin
digitalWrite(in4, LOW); //Left Motor forword Pin
}


No comments:
Post a Comment