1. Structure
Arduino programs can be divided into three main parts: Structure, Values (variables and constants), and Functions. In this tutorial, we will learn about the Arduino software program, step by step, and how we can write the program without any syntax or compilation error.
Let us start with the Structure. Software structure consists of two main functions −
- Setup( ) function
- Loop( ) function
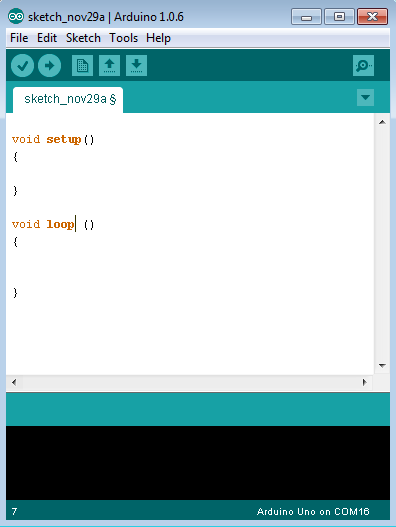
 Void setup ( ) {
 }
PURPOSE − The setup() function is called when a sketch starts. Use it to initialize the variables, pin modes, start using libraries, etc. The setup function will only run once, after each power-up or reset of the Arduino board.
INPUT − -
OUTPUT − -
RETURN − -
 Void Loop ( ) {
 }
PURPOSE − After creating a setup() function, which initializes and sets the initial values, the loop() function does precisely what its name suggests, and loops consecutively, allowing your program to change and respond. Use it to actively control the Arduino board.
INPUT − -
OUTPUT − -
RETURN − -
2.Variable and Data Types
- int
Integers are the primary data-type for number storage. int stores a 16-bit (2-byte) value. This yields a range of -32,768 to 32,767 (minimum value of -2^15 and a maximum value of (2^15) - 1).
int number = 52;
Unsigned int
Unsigned int num = 60 ;
float
float num = 1.352;
- double
On the Uno and other ATMEGA based boards, Double-precision floating-point number occupies four bytes. That is, the double implementation is exactly the same as the float, with no gain in precision. On the Arduino Due, doubles have 8-byte (64 bit) precision. double num = 45.352 ;
- byte
A byte stores an 8-bit unsigned number, from 0 to 255. byte m = 25 ;
- word
On the Uno and other ATMEGA based boards, a word stores a 16-bit unsigned number. store 0 to 65535 ((2^16)-1) word w = 1000 ;
- short
A short is a 16-bit data-type. On all Arduinos (ATMega and ARM-based), a short stores a 16-bit (2-byte) value. This yields a range of -32,768 to 32,767 (minimum value of -2^15 and a maximum value of (2^15) - 1 short val = 13 ;
- long
Long variables are extended size variables for number storage, and store 32 bits (4 bytes), from -2,147,483,648 to 2,147,483,647.
Example
long velocity = 102346 ; - unsigned long
Unsigned long variables are extended size variables for number storage and store 32 bits (4 bytes). Unlike standard longs, unsigned longs will not store negative numbers, making their range from 0 to 4,294,967,295 (2^32 - 1). Unsigned long velocity = 101006 ;
- char
A data type that takes up one byte of memory that stores a character value. Character literals are written in single quotes like this: 'A' and for multiple characters, 
Char chr_a = ‘a’ ; Char chr_a = 65 ;
- String
strings use double quotes: "ABC". String value = "Welcome to Arduino programing"
3.Function Digital I/O
- pinMode
Description
Configures the specified pin to behave either as an input or an output. See the Digital Pins page for details on the functionality of the pins.
As of Arduino 1.0.1, it is possible to enable the internal pullup resistors with the mode INPUT_PULLUP. Additionally, the INPUT mode explicitly disables the internal pullups.
Syntax
pinMode(pin, mode)
Parameters
pin: the Arduino pin number to set the mode of.mode: INPUT, OUTPUT, or INPUT_PULLUP. See the Digital Pins page for a more complete description of the functionality.
Example Code
The code makes the digital pin 13 OUTPUT and Toggles it HIGH and LOW
void setup() {
  pinMode(13, OUTPUT);    // sets the digital pin 13 as output
}

void loop() {
  digitalWrite(13, HIGH); // sets the digital pin 13 on
  delay(1000);            // waits for a second
  digitalWrite(13, LOW);  // sets the digital pin 13 off
  delay(1000);            // waits for a second
}
- digitalWrite()
Description
Write a HIGH or a LOW value to a digital pin.
If the pin has been configured as an OUTPUT with pinMode(), its voltage will be set to the corresponding value: 5V (or 3.3V on 3.3V boards) for HIGH, 0V (ground) for LOW.
If the pin is configured as an INPUT, digitalWrite() will enable (HIGH) or disable (LOW) the internal pullup on the input pin. It is recommended to set the pinMode() to INPUT_PULLUP to enable the internal pull-up resistor. See the Digital Pins tutorial for more information.
If you do not set the pinMode() to OUTPUT, and connect an LED to a pin, when calling digitalWrite(HIGH), the LED may appear dim. Without explicitly setting pinMode(), digitalWrite() will have enabled the internal pull-up resistor, which acts like a large current-limiting resistor.
Syntax
digitalWrite(pin, value)
digitalWrite(pin, value)
Parameters
pin: the Arduino pin number.
value: HIGH or LOW.
pin: the Arduino pin number.value: HIGH or LOW.
- delay()
Description
Pauses the program for the amount of time (in milliseconds) specified as parameter. (There are 1000 milliseconds in a second.)
Syntax
delay(ms)
Parameters
ms: the number of milliseconds to pause. Allowed data types: unsigned long.
Example Code
The code pauses the program for one second before toggling the output pin.
int ledPin = 13; // LED connected to digital pin 13
void setup() {
pinMode(ledPin, OUTPUT); // sets the digital pin as output
}
void loop() {
digitalWrite(ledPin, HIGH); // sets the LED on
delay(1000); // waits for a second
digitalWrite(ledPin, LOW); // sets the LED off
delay(1000); // waits for a second
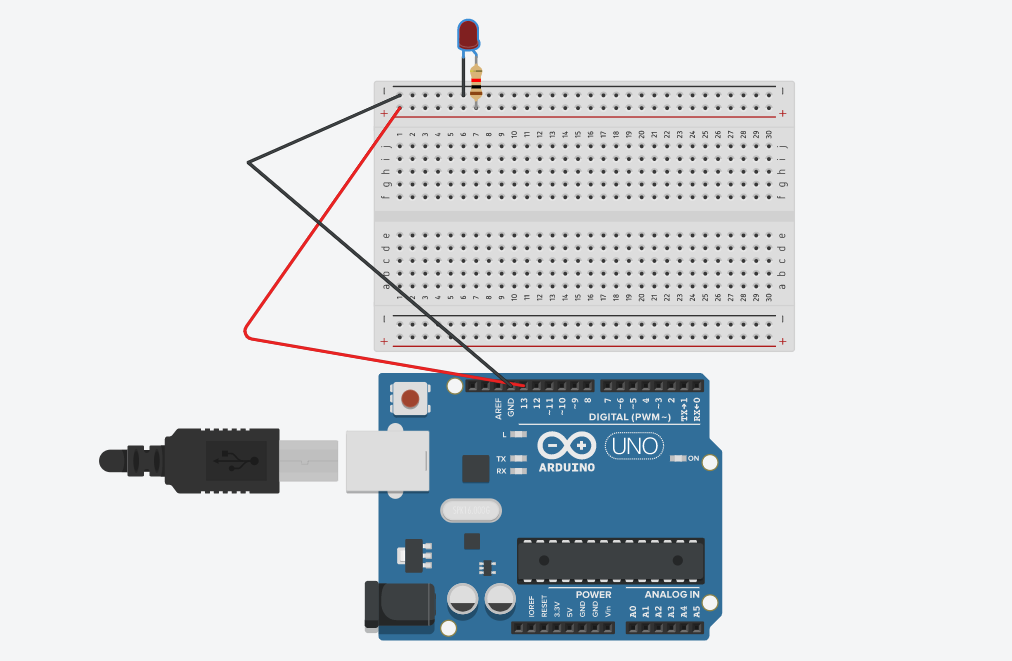
}Circuit
- digitalRead()
Description
Reads the value from a specified digital pin, either HIGH or LOW.
Syntax
digitalRead(pin)
Parameters
pin: the Arduino pin number you want to read
Returns
HIGH or LOW
Example Code
Sets pin 13 to the same value as pin 7, declared as an input.
int ledPin = 13;  // LED connected to digital pin 13
int inPin = 7;    // pushbutton connected to digital pin 7
int val = 0;      // variable to store the read value

void setup() {
  pinMode(ledPin, OUTPUT);  // sets the digital pin 13 as output
  pinMode(inPin, INPUT);    // sets the digital pin 7 as input
}

void loop() {
  val = digitalRead(inPin);   // read the input pin
  digitalWrite(ledPin, val);  // sets the LED to the button's value
}
Circuit

4.Serial Monitor
Serial.begin()
Description
Sets the data rate in bits per second (baud) for serial data transmission. For communicating with Serial Monitor, make sure to use one of the baud rates listed in the menu at the bottom right corner of its screen. You can, however, specify other rates - for example, to communicate over pins 0 and 1 with a component that requires a particular baud rate.
An optional second argument configures the data, parity, and stop bits. The default is 8 data bits, no parity, one stop bit.
Syntax
Serial.begin(speed)
Example Code
 void setup() {
  Serial.begin(9600);
 }
 void loop() {
  Serial.println("Welcome to Bangladesh");
  delay(1000);
 }
Serial.read()
Description
Reads incoming serial data.
Serial.read() inherits from the Stream utility class.
Syntax
Serial.read()
Example Code
char input;

void setup() {
    Serial.begin(9600);
    delay(2000);

    Serial.println("Type something!");
}

void loop() {
    if(Serial.available()>0){
        input = Serial.read();
        Serial.print("You typed: " );
        Serial.println(input);

    }
}
Serial.print()
Description
Prints data to the serial port as human-readable ASCII text. This command can take many forms. Numbers are printed using an ASCII character for each digit. Floats are similarly printed as ASCII digits, defaulting to two decimal places. Bytes are sent as a single character. Characters and strings are sent as is. For example-
Serial.print(78)gives "78"Serial.print(1.23456)gives "1.23"Serial.print('N')gives "N"Serial.print("Hello world.")gives "Hello world."
Syntax
Serial.print(val)
Serial.print(val, format)
Serial.available()
Description
Get the number of bytes (characters) available for reading from the serial port. This is data that’s already arrived and stored in the serial receive buffer (which holds 64 bytes).
Serial.available() inherits from the Stream utility class.
Syntax
Serial.available()
5.Function Analog I/O
analogRead()
[Analog I/O]
Description
Reads the value from the specified analog pin. Arduino boards contain a multichannel, 10-bit analog to digital converter. This means that it will map input voltages between 0 and the operating voltage(5V or 3.3V) into integer values between 0 and 1023. On an Arduino UNO, for example, this yields a resolution between readings of: 5 volts / 1024 units or, 0.0049 volts (4.9 mV) per unit. See the table below for the usable pins, operating voltage and maximum resolution for some Arduino boards.
The input range can be changed using analogReference(), while the resolution can be changed (only for Zero, Due and MKR boards) using analogReadResolution().
On ATmega based boards (UNO, Nano, Mini, Mega), it takes about 100 microseconds (0.0001 s) to read an analog input, so the maximum reading rate is about 10,000 times a second.
| BOARD | OPERATING VOLTAGE | USABLE PINS | MAX RESOLUTION |
|---|---|---|---|
Uno | 5 Volts | A0 to A5 | 10 bits |
Mini, Nano | 5 Volts | A0 to A7 | 10 bits |
Syntax
analogRead(pin)
Parameters
pin: the name of the analog input pin to read from (A0 to A5 on most boards, A0 to A6 on MKR boards, A0 to A7 on the Mini and Nano, A0 to A15 on the Mega).
Returns
The analog reading on the pin. Although it is limited to the resolution of the analog to digital converter (0-1023 for 10 bits or 0-4095 for 12 bits). Data type: int.
Example Code
The code reads the voltage on analogPin and displays it.
 int analogPin = A3; // potentiometer wiper (middle terminal)
            // connected to analog pin 3
           // outside leads to ground and +5V
 int val = 0; // variable to store the value read
 void setup() {
  Serial.begin(9600);      // setup serial
 }
 void loop() {
  val = analogRead(analogPin); // read the input pin
  delay(1000);
  Serial.println(val);     // debug value
 }
Circuit

analogWrite()
[Analog I/O]
Description
Writes an analog value (PWM wave) to a pin. Can be used to light a LED at varying brightnesses or drive a motor at various speeds. After a call to analogWrite(), the pin will generate a steady rectangular wave of the specified duty cycle until the next call to analogWrite() (or a call to digitalRead() or digitalWrite()) on the same pin.
| BOARD | PWM PINS | PWM FREQUENCY |
|---|---|---|
Uno, Nano, Mini | 3, 5, 6, 9, 10, 11 | 490 Hz (pins 5 and 6: 980 Hz) |
Syntax
analogWrite(pin, value)
Parameters
pin: the Arduino pin to write to. Allowed data types: int.value: the duty cycle: between 0 (always off) and 255 (always on). Allowed data types: int.
Example Code
Sets the output to the LED proportional to the value read from the potentiometer.
 int ledPin = 9;   // LED connected to digital pin 9
 int val = 90;     // variable to store the read value
 void setup() {
  pinMode(ledPin, OUTPUT); // sets the pin as output
 }
 void loop() {
  analogWrite(ledPin, val/4); // analogRead values go from
                       //analogWrite values from 0 to 255
 }
Circuit

6. Light Brithnase control
Circuit

Code
 int ledPin = 6;   // LED connected to digital pin 6
 int analogPin = A3;  // potentiometer connected to analog pin 3
 int val = 0;     // variable to store the read value
 void setup()
 {
  pinMode(ledPin, OUTPUT);  // sets the pin as output
 }
 void loop()
 {
  val = analogRead(analogPin);  // read the input pin
  analogWrite(ledPin, val / 4); // analogRead values go from 0 to 1023,analogWrite values from 0 to 255
 }


No comments:
Post a Comment